Clean, Flat Bases Come Before Fast Wax
Wax cannot compensate for neglected ski bases. Before applying a fresh layer, inspect the base under good light. White or grey patches, especially near the tips and tails, are a sign of dryness. Fine scratches are normal, but deeper gouges and an uneven base should be addressed before they compromise glide.
A clean base accepts wax more evenly. For regular maintenance, brushing out dirt and old surface residue is often enough. If the ski has been used in dirty spring conditions, transported on a roof rack, or stored with old contaminated wax, a proper cleaning is worthwhile. Avoid aggressive solvents unless they are specifically designed for ski bases, as repeated use can dry the material and reduce wax absorption.
Base structure matters as well. The fine pattern ground into the base manages water beneath the ski. In very cold, dry conditions, a finer structure generally helps. In wetter snow, a more open structure can reduce suction by moving water away. This is a service-area decision, and it is one reason serious skiers benefit from professional tuning rather than treating every base with the same all-purpose finish.
At Euro-Sports, precision ski tuning with SkiSelector technology helps take the guesswork out of base preparation and structure selection. It is particularly useful when your skis are fast in one condition but consistently disappointing in another.
How to Apply Glide Wax Properly
For most Nordic skiers, hot waxing remains the most durable and effective way to condition a sintered base. Liquid and spray products are convenient for quick touch-ups, but they do not usually offer the same durability for a long training day or a race effort.
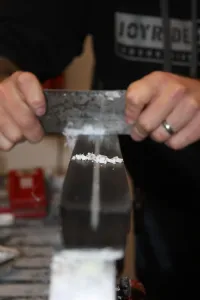
Set your ski securely in a profile or vise. Brush the base first, then choose an iron temperature appropriate to the wax. Too much heat can damage the base, while too little prevents the wax from flowing properly. Drip wax sparingly along the ski, then move the iron continuously from tip to tail until the wax is evenly distributed. Do not let the iron sit still.
Let the ski cool fully before scraping. This allows the wax to harden in the base rather than being pulled out while it is still warm. Scrape with a sharp plastic scraper until excess wax is removed, then brush from tip to tail. Brushing is where many home wax jobs fall short. The goal is not to leave a visibly thick coat of wax on the ski. The goal is to leave wax in the base while clearing the structure so it can manage snow and moisture.
For routine training, a brass or bronze brush followed by nylon is a dependable sequence. A finer finishing brush can add polish for racing or important events. Use clean brushes and work consistently from tip to tail. Brushing back and forth can leave debris in the structure and reduce the benefit of the wax you just applied.
Grip Waxing Is a Different Problem
Classic skiers have two jobs: make the tips and tails glide, then create reliable kick underfoot. Do not apply grip wax where glide wax belongs. The kick zone is specific to the ski and skier, and it should be marked based on your weight, technique, and ski flex.
Traditional hard kick wax works best in colder, drier conditions. Applied in thin layers and corked smooth, it provides excellent feel when matched correctly. As the snow approaches freezing or becomes wet and glazed, klister may be the better choice. It is messier, but it can be the difference between secure climbing and a frustrating day of slipping.
The trade-off is clear: more grip often means more drag. A thick, overly soft kick zone can make a ski feel slow even when the glide zones are perfectly prepared. If you are skiing rolling terrain, favour the least aggressive grip that still lets you climb with confidence. Racers often use a thin binder layer and multiple carefully selected top layers, but recreational skiers can make major gains by simply keeping applications thin, smooth, and matched to the day.
Skin skis simplify grip waxing, not all ski maintenance. The mohair or synthetic skin must be clean and directional, and the glide zones still need regular waxing. A skin care product can help prevent icing in damp conditions, but it cannot replace a properly prepared base.
A Practical Wax Routine for Ottawa Skiers
If you ski once or twice a week, hot wax your glide zones every few outings, or sooner when the bases look dry. Brush before each ski, especially after a long drive with skis on the car. For classic waxable skis, refresh your kick wax whenever it wears unevenly, gets dirty, or no longer matches the conditions.
Before a major loppet, a Gatineau weekend, or a focused block of training, give yourself time to test. Wax one ski with a slightly colder option and the other with a slightly warmer option, then compare glide on a gentle downhill. This simple test will teach you more about local snow than any wax chart alone.
Keep a compact kit in your vehicle or ski bag: a scraper, cork, a couple of temperature-appropriate grip waxes if you ski classic, a small brush, and a quick glide option for emergencies. You do not need every wax on the wall. You need a few reliable products, a clean process, and enough time to use them well.
When a Shop Wax Job Makes Sense
A home setup is ideal for regular upkeep, but professional service earns its place when bases need repair, skis need a fresh structure, or conditions matter. It is also a smart option before a race when you would rather focus on pacing, nutrition, and sleep than spend the evening diagnosing your wax bench.
Bring your skis in with a clear description of where and when you will be skiing. Mention whether you are skating, classic skiing, or using skins, along with your event distance and expected temperatures. Good ski service is not one generic process. A 10 km hard-packed training loop, a spring Gran Fondo-style Nordic event, and a multi-hour marathon call for different priorities.