Start With Your Actual Foot Measurements
Shoe sizing varies significantly between brands, and a European size is not always directly comparable to your usual running-shoe size. Measure both feet at the end of the day, when they are slightly fuller, while wearing the sock thickness you ride in. Stand with your heel against a wall, mark the end of your longest toe, then measure the distance in millimeters.
Measure the width, too. A foot can be average in length but need a wider last through the forefoot, or it may be narrow at the heel and higher over the instep. Those details matter more in cycling shoes than many riders expect because performance uppers do not stretch dramatically after purchase.
Use the larger foot as your reference. Most people have a small difference in length or width between feet. You should never size down to accommodate the smaller foot, since a shoe that compresses the larger foot will become painful under load. Fine-tune the smaller side with the closure system, an insole adjustment or, where appropriate, a thin volume reducer.
How to Size Cycling Shoes: Check Length First
With the shoe on and fully fastened, stand up and put your weight evenly through both feet. Your heel should sit firmly in the heel cup, and your toes should rest naturally without touching the front. A small amount of space ahead of the longest toe is necessary, typically about 5 to 10 millimeters, but it should not feel like a loose running shoe.
Cycling shoes work best with a close, supportive fit because the foot is held in a fixed position through every pedal stroke. Still, close should not mean cramped. Your toes need room to spread slightly when you are working hard, especially on long climbs, hot days and sustained indoor sessions where feet can swell.
Check the shoe seated in a riding position if possible. Bend your knee forward as though you are at the top of the pedal stroke, then press down through the forefoot. If your toes jam against the front, move up a size or try a different shape. If the heel rises noticeably, first tighten the closure system. If lift remains, the heel cup or overall volume may not suit your foot.
Width and Volume Are Not the Same Thing
A shoe can feel too tight for several different reasons. Pressure along the outside of the little toe or across the metatarsals usually points to insufficient width. Pressure across the top of the foot may indicate too little instep volume or an overly aggressive closure adjustment. A heel that moves while the forefoot feels secure can mean the shoe is too high-volume around the ankle rather than too long.
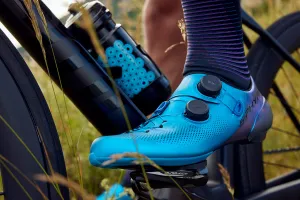
This distinction helps you choose the right solution. Going up a full size may add unwanted length without solving a width issue. Instead, look for a brand or model offered in a wide fit, or one built on a roomier last. Riders with narrower feet often benefit from a more precise heel cup and dual-dial closure system that can independently control tension over the forefoot and upper.
Do not expect a premium synthetic upper to break in like a leather dress shoe. Modern cycling shoes are designed to hold their shape for consistent power transfer. They may soften slightly after several rides, but a pressure point that is obvious on day one is unlikely to disappear.
Match the Fit to Your Riding Discipline
Road shoes usually prioritize low weight, a stiff sole and a close, race-ready fit. With little walking involved, they can be more structured around the foot. That said, a road shoe still needs enough toe room for a four-hour club ride or a long gran fondo.
Gravel and cyclocross riders need similarly efficient pedaling, but should consider the realities of hike-a-bike sections, dismounts and rough terrain. A grippy tread and recessed cleat add versatility, while a slightly more accommodating upper can be welcome on long mixed-surface days. Do not oversize just to make walking easier. Choose a purpose-built off-road shoe instead.
Mountain bike shoes tend to offer more protection and more walking traction, particularly for trail and enduro riding. The fit should still be secure at the heel and midfoot, but riders who frequently put a foot down may prefer a little more comfort around the toe box. For cross-country racing, fit often trends closer to a road shoe because direct power transfer is the priority.
Indoor cycling creates its own fit challenge. Feet can heat up and swell quickly in a warm training room. Start with a well-fitted shoe, use a proper fan and avoid overtightening the dials before a hard interval session. If you consistently experience numbness indoors but not outdoors, heat management and closure tension may be the issue rather than the shoe size.
Set the Closure System With Intention
BOA-style dials, ratchets, laces and hook-and-loop straps all work when adjusted correctly. The best system is the one that holds your foot evenly without creating a concentrated pressure point. Fasten the shoe firmly around the midfoot and heel, then keep the forefoot secure but not squeezed.
A common mistake is cranking every closure as tight as possible before rolling out. Your foot naturally expands during a ride, and excessive tension can compress nerves across the top of the foot. If you develop tingling or numbness, back off the closure in small increments before assuming you need a new size.
Wear your usual cycling socks during every fit check. Thick winter socks may require a different adjustment than lightweight summer socks, and some riders who train year-round are best served by a dedicated cold-weather shoe rather than sizing up their summer pair.